File Specifications
How should I prepare a file for printing with you?
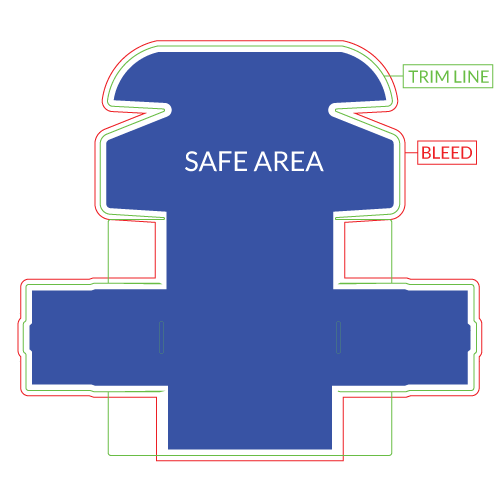
The basic and easiest answer to this question is that you supply a PRINT READY .PDF file. We recommended a minimum of 300dpi, converted to CMYK colorspace, all fonts outlined AND embedded. Specify your trim area with crop marks (Don’t place crop marks inside the work area). Make sure you have a minimum of 1/8” (0.125”) BLEED on all edges of your job, and a 1/8” (0.125”) SAFE area that has all critical design element such as text, pulled away from trim.
Following these guidelines, and CAREFULLY CHECKING THE RESULTING PDF before uploading will greatly reduce the possibility of error and accelerate your job through production.
PDF print ready files:
Minimum resolution of 300 dpi
CMYK colorspace
All fonts outlined and embedded
Specify trim area with crop marks (Don’t place crop marks inside the work area)
Artwork should have 1/8” (0.125”) bleed from trim line
Information content (“Safe Area”) should be 1/8” (0.125”) away from trim line.
We also accept:
Microsoft Word
Adobe Indesign
Adobe Illustrator
Adobe Photoshop
QuarkXpress]
.eps
.jpegs
.tiff
.psd
.qxd
.jpeg
Note: We prefer that you send us a .pdf print ready file. For files created in Microsoft programs you may have to download a free utility such as PrimoPDF (http://www.primopdf.com) to convert your job to .pdf form. Please understand that we are not responsible for how you convert these unsupported file types. Please double check your final .pdf before submission. If your job comes out incorrectly because of problems stemming from a bad conversion, we will not be responsible.
How much bleed do you require?
We require a minimum of 1/8” (0.125”) bleed on all projects.
This will add 1/4” (0.25”) to your overall image area, on both dimensions. Below are some example layout files incorporating our templates available in our Product Templates section.
In this example, if you wanted to print a 3.5” x 2” standard business card with image all the way to the edge, you would need to submit a file 3.75” x 2.25”.
A bleed is importatant as cutting in stacks will never be perfect due to the cutting blade causing a slight shift on the paper, losing the precision of the intended cut. This is why bleed is necessary to compensate for the shifting.
If bleed is not provided on a document, the final result of a trimmed job may possibly result in a slight white border around the edge. The example below will illustrate why bleed is important.
What is a Safety area and why we need it?
The safety area is the inner area to prevent information from getting cut off.
How do I set up a dieline?

Dielines should always be placed in their own layer, separate from the art. Usually 100% magenta, sepcified as a spot color to seperate from CMYK values. For non-illustrator formats please include a separate dieline file in a vector format (.ai or .eps) file. Please do not embed dielines into artwork.
How do I setup score and perf lines?
Well like dielines these do not print. They should be set as 100% cyan or black and specified as a spot color in your color pallete. The only difference between these 2 lines is that the perf line will be dashed.
______________________ _ _ _ _ _ _ _ _ _ _ _ _ _ _
SCORE LINE PERF LINE
How do I prepare a file for diecutting?
Once we’ve got the front side laid out we need to indicate where the die cut will be. The die cut line (dieline) needs to be on a separate layer and set to 100% black ink for the stroke. With our design, we want our Clubcard Peace character in the centre of the card. There is no bleed so we need to ensure that there is a 1/8” margin between the artwork and the dieline. We have also included a hole so that we can hang this card once it is cut out. Please ensure that any holes are 1/8” in diameter.
Please Note: If you intend on having a bleed on the front side of your cards, that it extends 1/8” past the dieline.
Now hide both front layers and create a new layer for the Back side as well as the Dieline for the back.
Now that we have the front setup we’ll bring in the dieline for the back of the card. Looking at the back of the card you want to keep in mind that the dieline shape for the front will be a mirrored shape on the back. Additionally the artwork on the backside will also be mirrored, so you will want to flip the image when setting up the file. To do this you select your object (artwork) and go to the Object menu, select Transform and select reflect and reflect the image vertically.
Now we can bring in the artwork for the back side of our card. You will follow the same steps as the back dieline. However, you will want to make sure that you’ve kept all important graphics and text a safe distance (1/8”) away from the dieline, as well as extend any bleed 1/8” past the dieline. This is so that if the die cut fluctuates, no critical text or graphics are cut off.
Now we want to save our files for print. You go up to the File menu, select save as, and save as a PDF. We need to export each layer individually and label them correctly. For the front file we will hide all the other layers and export a PDF with only the elements meant to print on the front. We will name the front CMYK layer: Diecut_Front.pdf
